Showing posts with label baking. Show all posts

Tuesday, October 7, 2014

Fake Peanut Butter Cookies


I've been craving cookies for days, but I'm trying to eat clean again because my winter coats don't fit and my jeans are tight. 
As you can see, my willpower was nonexistent because I baked these yummy "Peanut Butter" cookies. Except there is no peanut butter in my kitchen and I replaced it with my favourite nut free blend called Superbutter. I buy it at Costco. 

"Peanut Butter" Cookies:
1 cup peanut butter (or peanut free replacement like Superbutter or Wow Butter)
1 cup brown sugar
1 egg
1 tsp. Baking soda
Optional: chocolate chips

1. Mix peanut butter, sugar, and egg in a bowl with a spoon or hand mixer.
2. Add baking soda. Add chocolate chips if you are using them. 
3. Use a spoon to scoop dough and roll into balls. Use a fork to press down gently. 
4. Place on a baking sheet. (They do spread)
5. Bake at 350 degrees F for 8-10 minutes. Let cool on tray for a few minutes because they will be soft. 

These cookies are soft and chewy and gluten free too! They mixed up in less than five minutes so they are a quick and easy recipe, which is good and bad depending on if you are trying to be healthy or not. Luckily the recipe only made about 15 cookies. In my case, they were delicious enough to be worth the cheat and I made sure I packed them in Tyler's lunch so they weren't hanging around the house. 


Saturday, September 27, 2014

Pumpkin Loaf


I've made this pumpkin loaf a hundred times but am just getting around to posting the recipe. The original recipe makes 4 loaves, but I cut it in half. Sometimes I make one loaf and then a pan of muffins instead.

This loaf is crispy on the outside and moist on the inside and you can load it with chocolate chips! Or in my case, carob chips.


Pumpkin Loaf

  • 2 3/4 Cups Flour (I use gluten free)
  • 1 1/2 tsp. Baking Soda
  • 1 tsp. Salt
  • 2 tsp. Cinnamon
  • 2 tsp. Nut Meg
  • 2 1/4 Cups Sugar
  • 3/4 Cup Cooking oil
  • 3 Eggs
  • 1/2 Cup Water
  • 1/2 Cup Pumpkin
  • Optional
  • 1½ Cup Chpped Nuts
  • 1½ Cup Chocolate Chips
  • Butterscotch Chips


  • Topping:
  • Brown Sugar
  • Chocolate Chips/Butterscotch Chips

    1. Mix dry ingredients together.
    2. Make a hole in the middle and add the other ingredients. Mix until smooth.
    3. Pour mixture into bread pans. Sprinkle the top with brown sugar and chocolate chips to taste.
    4. Bake at 350ยบ F. for 50 minutes. (Less time for muffins)

    Sunday, March 16, 2014

    Meringues


    I made a lemon curd filling for a cake and had a bunch of egg whites left over. I didn't want to make another omelet out of them so I tried meringues. They turned out so great I was afraid I would eat them all so I took them to work instead. They got rave reviews so I thought I would share the recipe.
     
    Meringues
    • 4 egg whites, room temperature (very important)
    • 1/4 tsp. salt
    • 1/4 tsp. cream of tartar
    • 1 Tbsp. vanilla extract
    • 1 1/4 cups granulated sugar
    • 1 cup mini semisweet chocolate chips (I used carob chips)
    Method:
    Preheat oven to 300 degrees F. Line a baking sheet (or two, or three) with parchment paper.
    Using a stand mixer, beat egg whites, salt, cream of tartar and vanilla on medium-high speed until soft peaks form. Slowly add sugar and beat until stiff peaks form, about 5 minutes. Gently fold in chocolate chips by hand until combined.
    Drop batter by heaping tablespoon-fulls onto cookie sheet. Bake at 300 degrees for 25-30 minutes until the cookies are cooked and slightly golden. Turn the oven off, and let the cookies cool in the oven for an additional 20-30 minutes until cool. Remove and serve immediately, or store in an airtight container.
     
    I found this recipe on Pinterest and if you visit this site she has tips for perfect meringues every time. She also explains what soft and stiff peaks are.
    Try out the recipe! It is very easy and the meringues are the perfect chewy texture that remind me of smores.

    Wednesday, February 12, 2014

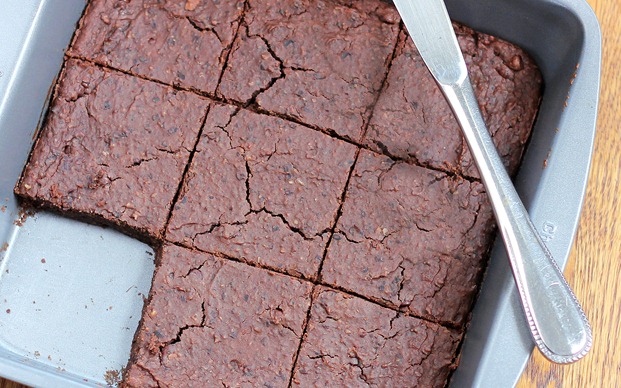
    Black Bean Brownies

    I have been struggling to eat clean and keep the weight off. And my sugar cravings? Insane! Luckily I found a website that I swear I took a screenshot of 15 recipes on my iPad so I could make them sometime.

    The blogger turns unhealthy recipes into healthy(ier) treats and the first one I tried was the Black Bean Brownies recipe. I ate 3 fresh from the oven then I took the rest to work and they were a hit there too! Check out http://chocolatecoveredkatie.com/!

    These brownies aren't chewy like regular brownies, but if you can live with that then you will love this recipe! And they don't have flour in them so they are gluten free.

    I didn't take any pictures...I was too busy eating brownies, so check out the link to see Katie's lovely pics. I also adapted her recipe to suit my needs (caffeine free using carob instead) and added dried cranberries.

    bean brownies

    Black Bean Brownies

    • 1 1/2 cups black beans (1 15-oz can, drained and rinsed very well) (250g after draining)
    • 2 tbsp carob powder (or cocoa powder)
    • 1/2 cup quick oats (40g)
    • 1/4 tsp salt
    • 1/3 cup honey (pure maple syrup or agave work too)
    • 2 nunaturals stevia packs or 2 tbsp sugar (or omit and increase honey to 1/2 cup)
    • 1/4 cup coconut or vegetable oil (40g)
    • 2 tsp pure vanilla extract
    • 1/2 tsp baking powder
    • 1/2 cup to 2/3 cup carob chips (115-140g) (or chocolate chips)
    • 1/2 cup dried cranberries

    Black Bean Brownies Recipe: Preheat oven to 350 F. Combine all ingredients except chips in a good food processor, and blend until completely smooth. Really blend well. (A blender can work if you absolutely must, but the texture—and even the taste—will be much better in a food processor.) Stir in the chips and cranberries, then pour into a greased 8×8 pan. Optional: sprinkle extra chocolate chips over the top. Cook the black bean brownies 15-18 minutes, then let cool at least 10 minutes before trying to cut. Makes 9-12 brownies.

    Sunday, December 15, 2013

    Sugar Cookie Recipe

    Today was a sugar cookie baking day! My students have been performing Random Acts of Kindness and they decided they wanted to deliver Christmas cookies to people/places in the community. Since I only have them in class for an hour I had to bake the cookies and they will decorate them tomorrow at school.

    Sugar Cookies
    1 1/2 cups butter or margarine
    2 cups sugar
    4 eggs
    1 tsp. vanilla
    5 cups flour
    2 tsp. baking powder
    1 tsp. salt

    Cream the butter and sugar in a mixer. Add the eggs one at a time. Add the vanilla. In a separate bowl, mix flour, baking powder, and salt, then combine with the wet mixture. Wrap in Saran wrap and chill in the fridge for at least 30 minutes.

    Roll out sections of dough on a floured surface and use a cookie cutter to make shapes.

    Bake in a 400 degree oven for 8-10 minutes, depending on the thickness of the cookies.

    Let cool, then ice with Royal Icing.

    These cookies are really simple to make and yummy to eat! You can even freeze them once baked and iced. Now I just need to try a gluten free version.

    Sunday, September 15, 2013

    Pumpkin Muffins


    It's Sunday once again which means I'm in my kitchen baking and cooking! The sun is shining bright and warm but it is chilly outside and I actually closed my windows. It is a perfect day to fill the house with the aroma of pumpkin muffins. 

    I found the recipe on Pinterest (surprise surprise!) but changed it to suit my needs. I don't think I ever follow recipes exactly as written which means I end up with something perfect for me. 

    Pumpkin Muffins
    1 3/4 cup flour (I used gluten free of course) 
    2 tsp. baking powder
    1 pkg. butterscotch pudding, dry
    1 tsp. salt
    1/2 cup sugar
    2 tsp. pumpkin pie spice (I am allergic to ginger so I used 1 tsp. all spice and 1 tsp. cinnamon instead)
    2 tsp. ground flax (optional- my own addition)
    2 tsp. chia seeds (optional-my own addition)

    Mix all of the above dry ingredients in a large bowl. 

    In a smaller bowl mix together:
    1/2 cup plus 1 tbsp. milk
    3/4 cup pure pumpkin puree
    1/4 cup applesauce (I used vegetable oil instead because I am allergic to fruit)
    1 egg, beaten

    Add the wet ingredients to the dry ingredients and gently mix until almost combined. Add 1 cup butterscotch chips and mix. 

    Bake in a 400 degree oven for 20 minutes. Check for doneness and cool completely otherwise they will stick to the wrapper. 

    I got 15 muffins from this recipe.


    Wednesday, August 14, 2013

    Family breakfast and scones


    We have family visiting from out of town so I decided to bake some scones to take to my parent's house for breakfast yesterday morning. 

    I have never baked scones before, but have had one from Starbucks! Baking is one of my favourite things to do so I was pretty sure I could make a scone. There were 8 of us so I decided to make two different batches; Oatmeal Cranberry Scones and Lemon Scones. 

    I also made an orange glaze for the Oatmeal Cranberry scones and a lemon glaze for half of the Lemon Scones to make them "fancier", but really the glaze just made them yummier! 


    Both scones were really good, but the favourite was the Oatmeal Cranberry Scone. It had a really good texture from
    the oatmeal with great flavour from orange zest and the dried cranberries.

    Oatmeal Cranberry Scones

    Yields 8:
    1 1/4 cups white whole wheat flour (I used gluten free)
    3/4 cup old fashioned oats
    2 Tbsp. sugar + 1 tsp. for dusting
    1 tsp. baking powder
    1/4 tsp. baking soda
    1/4 tsp. salt
    2 Tbps. butter
    2 Tbsp. plain yogurt (I used Greek yogurt)
    1/2 cup buttermilk
    1/3 cup Craisins
    zest from one large orange

    Glaze
    1/2 cup icing sugar
    juice from one orange
    1 Tbsp. butter, melted

    Preheat oven to 450F.
    Combine flour, oats, 2 Tbsp. sugar, salt, baking soda, and baking powder. Cut up butter into small pieces and work into the dry mixture. Hands work well here. Mix craisins in. Add the yogurt to your buttermilk (minus the 1 Tbsp.) and then add that to the dry mixture. Again, hands work best. A spoon just doesn’t cut it because the batter is so thick.
    Form mixture into an 8 inch circle. No precise measurements needed, just eyeball it. Flatten and make it an even height. Roughly 3/4-1 inch. Cut circle into 8 pie pieces and spread out on greased baking sheet.
    Brush tops with extra 1 Tbsp. of buttermilk and sprinkle tops with extra 1 tsp. sugar. Bake at 450F for 12-15 minutes, or until a tester comes out clean.
    To make the glaze, mix all of the ingredients together until you get the desired consistency (thinner to drizzle, thicker to spread). If you need to make it thinner, add more orange juice or milk. To make it thicker, add more icing sugar.


    Monday, August 12, 2013

    Happy birthday to me!

    My birthday was in July but I haven't got around to blogging in months and months. Partly this is due to not having Internet at my house and only using my iPhone to do everything online, but I prefer not to blog on it. I also prefer to take pictures on my Canon Rebel and uploading them over using my phone, but I have been missing blogging so I will sacrifice quality of pictures just to have some blog content. 

    First up is my 29th birthday! 

    I was a little sad that family was going to be out of town for my birthday this year so I decided to plan a party for myself. I invited some friends and we BBQ'd and played Ladder Golf and Frizz Sticks, and sat around outside visiting. Then we ate cake and ice cream....actually I ate a lot of cake and ice cream! 

    I recently discovered Birthday Party ice cream (sometimes called Birthday Cake ice cream) and OMG! I never ever eat ice cream but I can't stop eating this kind. It is wonderful. And it goes nicely with birthday cake. 

    This year I didn't make my cake from scratch because I wanted to try the Betty Crocker Gluten Free cake mix, and it didn't disappoint! No one could tell it was gluten free and it had a nice texture. Sometimes gluten free cakes are quite dense but this one wasn't. I've bought more of the cake mixes to have on hand if I need to whip up a cake or cupcakes, which can be found at all of the local grocery stores.

    There are only two negatives to this cake mix: 1) The price- because it is gluten free of course the price is insanely high (between $6 and $7/box), and 2) You need to buy two boxes to equal the amount you would get in one regular cake mix. I wanted two layers for my cake so I had to buy two boxes, where normally I would only need one box of every other boxed cake mix so the price of my birthday cake was quite high! 

    I then made a vanilla buttercream frosting to ice my cake and used LOTS of sprinkles. 


    Wednesday, April 24, 2013

    Gluten Free Carob Brownies


    My mom first made these brownies last Fall for a family supper, and they were good but I knew I could make them better. My mom's recipe turned out more cake like and I prefer fudgier brownies. I made a few changes to the recipe and came up with a brownie recipe that everyone loves. The best part? No one could tell they are gluten and chocolate free!

    Gluten Free Carob Brownies
    1/2 cup gluten free flour blend
    6 tbsp. carob powder
    1/4 tsp. salt
    1 cup sugar (I used 1/2 cup brown sugar and 1/2 cup white sugar)
    1/2 cup unsalted butter, softened
    2 large eggs
    1 tsp. vanilla extract
    1 cup carob chips
    Optional: nuts, chocolate chips

    Mix all ingredients together and pour batter into a greased baking pan. I added some carob powder to the pan to prevent sticking as well. The batter will be thick. Bake for 30 minutes at 350 degrees F in a metal pan or at 325 degrees F in a glass pan. They are done when a toothpick comes out clean.

    Corn Bread Muffins

    Earlier in the week I made some yummy Taco Soup but wanted something to go with it, so I whipped up a batch of my favorite cornbread recipe. I make this cornbread with chili a lot and always change it up a bit. This time I made the recipe in muffin tins instead of a pan, but sometimes I add jalapeno peppers to the mixture for a little heat!


    Corn Bread Recipe
    1/4 cup butter, softened
    3 tbsp. white sugar
    2 eggs
    1/2 cup plain greek yogurt
    1/2 cup milk
    1 cup gluten free flour blend
    2/3 cup cornmeal
    2 tsp. baking powder
    1/2 tsp. salt

    1. Mix butter and sugar. Add in eggs and mix well. Add in greek yogurt and milk and mix again. Add dry ingredients and mix until combined.
    2. Pour into a greased baking pan or muffin tins and bake for 18-22 minutes in a preheated 425 degree F oven or until the top is golden.
    3. Let cool slightly then serve with butter.  

    My favorite way to eat this cornbread is with soft butter and honey, but it is good dipped into chili and soup too.

    Tuesday, January 1, 2013

    Happy New Year!


    I realize that I haven't posted anything in months, but I got a little caught up in that thing called life.  Blogging wasn't exactly at the top of my list of priorities and I have to admit that there was so much going on that I wanted to write about but it was overwhelming and I ended up deleting everything before publishing. 

    But I'm back! And it is a new year! The first day of 2013...holy moly that seems weird to write. 

    Today I spent the day indoors with a headache (I'm sure I wasn't alone with this ailment), watching out the window as the snow fell softly.  I alternated between curling up on the couch with a blanket watching movies and "Keeping Up With The Kardashians"- my guilty pleasure!- and baking cookies in the kitchen.  It was a pretty perfect day, minus that pesky headache.

    While everyone made their new years resolutions, I carefully considered what I want to focus on this year.  And because lists make me feel good, I made one!

    1. Find the positive in everything (I tend to be quite negative...or I prefer to consider it realistic, and would like to change my mindset a bit).

    2. Tone up my body-I've lost the weight and kept it off for awhile now and it is time to lift heavier weights and do more cardio.  Admittedly, I've been slacking a lot lately at the gym because I'm getting bored but I will continue to set my monthly goals.

    3. Do things that make me happy- I am going to try yoga this month for the first time because I've been told that it will be good for my body and mind, continue going to Photography Club, blog more, read more books...

    4. Be more carefree, spontaneous, and open minded.

    5. Invest the same amount in relationships as is reciprocated onto me- I seem to put way more effort into my friendships and relationships than what I receive.  I can't help but care for others, but maybe I care too much about the wrong people and I'm not putting enough of my time into the important ones. I am re-evaluating who the important ones are as well.

    So you see I don't have one resolution, but a list of things I am going to concentrate on to be a happier person in 2013. I know that it is easy to say I'm going to do these things and life will get busy or complicated or challenging so I also decided to take one photograph of something that makes me happy each day for the whole year. I'm not going to put the pictures on my blog, but will post them to Facebook. I think this will be good for me because I will have to focus on what makes me happy each day and appreciate it, plus I will be getting to know and use my new camera more!  I'm actually excited about this project. 

    Today I will share the picture from Day 1 of 365 since I am also giving you the recipe to the cookies I baked. They are so good!
     
    Cracker Jack Cookies
     
    1 cup butter, softened
    1 cup brown sugar
    1 cup sugar
    2 eggs
    2 teaspoons vanilla
    1 teaspoon baking powder
    1 teaspoon baking soda
    1 1/2 cups flour (I used a gluten free blend)
    2 cups oatmeal
    1 cup coconut (I left the coconut out)
    2 cups Rice Krispies®
    1 cup of chocolate chips (I used carob chips)
     
    1. Cream butter and sugar. Beat in eggs and vanilla. Combine flour, baking powder and soda. Mix well. Stir in the remaining ingredients with a spatula. Drop by teaspoon on greased baking sheet or one lined with parchment paper. They will flatten and spread as they bake so don't put them too close together.  I only put 6 on at a time.
    2. Bake at 350 degrees for 10-12 minutes. Let sit on sheet for a few minutes before removing from baking sheet and cool completely.
    3. Enjoy with a glass of milk!


    Thursday, July 19, 2012

    Gluten Free Perfect Flour Blend


    This is the gluten free flour I use in my recipes and recently used in my Lemon Bundt Cake.
    
    It is a mixture of sweet brown rice flour, tapioca flour, arrowroot flour, sorghum flour, and xanthum gum.  It is sugar free, and made in a dedicated factory free of gluten, wheat, soy, corn, potato, peanuts, tree nuts, dairy, and casein. 

    I like this "flour" because you use it cup for cup in your regular recipes.  If you need 3 cups of flour for your cake, use 3 cups of this flour blend instead!  Easy!  I used this for a cake and no one would have known it was gluten free.

    Lemon Bundt Cake


    Yesterday was overcast, cool, and rainy.  Wednesday is also the day we go to my parent's house for supper every week. Sounded like the perfect day to bake a cake! I came across this recipe from Smitten Kitchen on Pinterest a few weeks ago and couldn't wait to try it out.

    The cake was time consuming, but simple to make. There are a few things I would do differently next time (yes there will be a next time--this cake is amazing!) to make the process even easier on myself.

    Lemon Cake
    Adapted from ‘Barefoot Contessa Parties!’ and
    www.SmittenKitchen.com
    Yield: 2 loaf cakes (or one bundt)

    2 sticks (1 cup) unsalted butter, at room temperature
    2 1/2 cups sugar
    4 extra-large eggs, at room temperature (I only had large)
    1/3 cup grated lemon zest (6 to 8 large lemons) *Tip: Zest all lemons before you begin and use the remainder of zest for chicken, fish, smoothies, etc. later
    3 cups all-purpose flour (I used a gluten free variety and it was perfect)
    1/2 teaspoon baking powder
    1/2 teaspoon baking soda
    1 teaspoon kosher salt (I used regular)
    3/4 cup plus 3 1/2 tablespoons freshly squeezed lemon juice *Tip: Juice 6 lemons before you begin
    3/4 cup buttermilk, at room temperature (I used buttermilk powder and water instead)
    1 teaspoon vanilla extract
    2 cups confectioners’ sugar, sifted (I didn't sift)


    Heat oven to 350 degrees F. Grease and flour two 8 1/2-by-4 1/4-by-2 1/2-inch loaf pans or one bundt pan, and line the bottoms with parchment paper (don't need to line the bundt pan).

    Cream butter and 2 cups sugar in the bowl of an electric mixer fitted with a paddle attachment for about 5 minutes, or until light and fluffy. Mixing at medium speed, add eggs, one at a time, and lemon zest.


    Sift together flour, baking powder, baking soda and salt in a bowl.

    In another bowl, combine 1/4 cup lemon juice, buttermilk and vanilla.


    Add flour and buttermilk mixtures alternately to butter and sugar mixture, beginning and ending with flour.


    Divide batter evenly between pans, smooth tops, and bake for 45 minutes to 1 hour, until a cake tester comes out clean.


    Combine 1/2 cup sugar with 1/2 cup lemon juice in a small saucepan, and cook over low heat until sugar dissolves.


    When cakes are done, let them cool 10 minutes. Brush some of the syrup on the "top" of the cake while it is still in the pan.


    Invert the cake onto a large plate, poke holes into the cake with a skewer, and brush lemon syrup over cakes with a brush. Let cakes cool completely.


    For glaze, combine confectioners’ sugar and remaining 3 1/2 tablespoons lemon juice in a bowl, mixing with a whisk until smooth. My icing was thick so I used more lemon juice but next time I would use milk instead because my icing was very lemon-y!


    Pour over top of cakes, and allow glaze to drizzle down the sides.


    This cake was so amazingly delicious, moist (that syrup step is important), tangy, and sweet. 


    I ate two pieces last night and am enjoying my last as I write this post.  The rest of the cake went to work with my husband for his coworkers to enjoy.  Had the cake remained in my house I would have ate it all.  Seriously. 

    Did I mention I skipped the gym yesterday to bake this cake?  So after 3 pieces of the most delicious lemon bundt cake I have ever eaten, I am going to spend a few hours at the gym today because the sun is shining and I am going to the beach tomorrow.  In a bikini.  It will be an ab workout day for sure.

    P.S. Make this cake NOW! 

    Thursday, June 21, 2012

    Vanilla Buttercream Frosting

    I had the WORST day.  Everything at work went wrong.  The students were loud, and even with 4 days left of school have decided they are done. I am feeling overwhelmed with end of year activities, report cards, and loose ends combined with planning my ten year high school reunion and doing house renovations, which all together are not good!

    So I made cupcakes.

    To be honest, my mom baked the cupcakes and I just frosted and decorated them.  I whipped up some vanilla buttercream in my KitchenAid mixer, which makes me happy everytime I use it (Thanks momma for the best gift ever!), then rolled out some fondant to make little stars to perch on top of the vanilla cupcakes.  They aren't anything fancy, but it was therapeutic to do. 

    I feel better.

    And my students will enjoy eating them tomorrow.


    Vanilla Buttercream Frosting

    1 cup unsalted butter, room temperature
    4 cups icing sugar, sifted
    1/4 tsp. salt
    1 tsp. vanilla (I don't measure, just pour a big splash!)
    2-3 Tbsp. milk

    Whip butter in a mixer, then add sifted icing sugar.
    Whip together until combined.
    Add salt, vanilla, and milk.
    Whip for a few minutes. 
    Add more milk if the icing is too thick, or add more icing sugar if it is too thin. 

    Sunday, May 6, 2012

    Happy Birthday Mom

    My mom's birthday was May 3, but we planned on having a family supper and birthday cake on May 5 instead so that my brother's girlfriend could be there.

    I decided to put what I learned in the fondant making class to work. Remember this post from April 12? Fondant Class

    Friday night I baked the cakes and made the buttercream frosting.  I found the vanilla cake recipe on Pinterest from this blog.

    Cake batter before the whipped egg whites

    Whipped egg whites

    Cakes in the oven

    Then I frosted between the layers and the top and sides of the cake with a lemon buttercream frosting.

    Lemon Buttercream Frosting: 
    1 cup room temp. butter
    4 cups sifted icing sugar
    3-4 Tbsp. milk
    1 tsp. vanilla extract
    pinch of salt
    zest of one lemon (leave out if you want plain vanilla buttercream)

    Saturday morning I continued the cake making...

    The next step was to make the fondant icing I learned to make in the class.  It was pretty easy until I rolled it out to place on top of the cake.  My husband had to help me out because I was so frustrated that the fondant kept sticking to the counter (shortening and icing sugar are your friend here!).

    Once the cake was covered in fondant I rolled out the leftover fondant and used a flower cookie cutter set to make decorations.


    Then I whipped up a second buttercream frosting, this time chocolate.

    Chocolate Buttercream Frosting:
    1 cup softened butter
    4 cups sifted icing sugar
    3/4 cup sifted cocoa
    pinch of salt
    3-4 Tbsp. milk

    I used the chocolate buttercream to pipe around the bottom of the cake to cover the fondant edge, and for the cupcakes I also made in case the cake was gross or we didn't have enough. 


    Then I added the finishing touches to the cake and it was perfect for my first ever homemade fondant cake! 


    Me with the birthday girl

    *Since I couldn't eat my creations I have no idea how they tasted, but was told the cake was dense (probably because it called for cake flour), but the buttercream and fondant icings were delicious.

    Monday, April 23, 2012

    Fondant class

    I recently took a fondant icing class offered in town.  I know it seems odd for me to take a class where I learn how to decorate cake when 1) I can't eat cake because of the gluten, and 2) I don't eat cake because it would wreak havoc on my weight loss goal, but .  I LOVE baking and have wanted to learn more about frosting and how to use fondant.

    First we learned how to make our own fondant icing, which was cool since I thought you just bought it at the store.  The instructor asked for someone to combine the ingredients to make the fondant and no one was jumping up to do it so I volunteered. I figured if I was going to do this at home, I should practice first and get a feel for it.


    After the fondant was made (it was so simple!) we frosted cupcakes with buttercream (YUM).  I felt good about my results, especially when a lot of the other people made huge messes of their own cupcakes during this step.

    After the buttercream was on top of the cupcake it was time to put on the fondant, which is where it can get tricky.  I am extremely picky about appearances so I didn't want lumpy fondant.  I think for my first time the fondant looked pretty good!


    Then we learned how to use different icing tips and techniques to decorate the fondant with pink buttercream. 


    I made one for my mom (the "M"), one for my dad ("D"), and one for my husband.  I couldn't eat the cupcake, but I did taste some of the leftover fondant icing and it was soooooooooooooo wonderful.  I am going to bake my mom's birthday cake and decorate it next week so I'll let you know how it goes and post some pictures.